I wanted to use this project to showcase some of the spacial issues and solutions that a designer may focus on as much as the homeowner will focus on the location of the refrigerator. Well, that and Polina’s photos are so stunning that I felt they deserved to be showcased in the zine as well as the portfolio.

This is the Keller kitchen as it once was. While a perfectly fine kitchen, the cabinets and floor are too close in color creating a four-sided visual enclosure to an already petite room. With a new finish palette, we want to push the walls out by anchoring the floor and lightening the vertical surfaces. The current lighting plan is only lighting the floor and counter and not the ceiling thus creating a dark plane pushing down on the space. Tracing this dark ceiling with puny crown molding is giving the ceiling more visual weight than it deserves. The accent lighting is too close in color to the cabinetry to be of any interest and too small for such a large void between the counter and the ceiling. The island has a built in eating surface as well as a recessed working surface. This effect cuts the island in half and creates an attention-drawing disruption. This wouldn’t be bad if the counters of the island were worthy of being the focal point of the kitchen but they draw your eye to the messiest part of any kitchen; the sink. Wendy selected a great backsplash tile. It is trying to make this contemporary kitchen less contemporary but the injection of color is drawing attention to the wall cabinet that seems to have been full of helium when it was installed. OK. So here is what we did:

1. We designed a new island worthy of a second glance. The edge profile of this 40”x100” Calcutta Gold marble island top has been beefed-up to a chunky 2 ½” to avoid appearing visually flimsy.
2. Islands are special and deserve their own identity so we designed a base that stands out from the kitchen cabinets both in styling and color.
3. Barstools and counter stools are always on the go so make sure they are prepared to travel across your new floor. These McGuire stools have a firmly attached, clear plastic foot that can be dragged without scuffing. When stool meets floor the harder material will always win. Wendy gets a gold star for selecting a stool with a base wider than the seat. This means it will be less likely to tip when her little ones scale the sides. Not to mention that scooped walnut seat is stunning!
4. A room has layers: a foreground, a middle ground and a background. The previous design focused only on the foreground and neglected the way the three zones layer against one another. This back elevation has created a frame for the range but also a frame for the chandeliers. Lighting this wall pulls the eye, helping elongate the space. Remember, dark objects proceed, light objects recede.
5. I tend to refer to the range as the “captain’s chair” of the kitchen. Asymmetry and symmetry can be effective tools when punctuating a design element. While there is nothing symmetrical in this design, we opted to force symmetry at the range to make it distinct from the rest of the kitchen. To push it’s identity even further, we made the adjacent drawer-faces from stainless steel and exaggerated the length of the hood emphasizing the span of the work zone.
5. I tend to refer to the range as the “captain’s chair” of the kitchen. Asymmetry and symmetry can be effective tools when punctuating a design element. While there is nothing symmetrical in this design, we opted to force symmetry at the range to make it distinct from the rest of the kitchen. To push it’s identity even further, we made the adjacent drawer-faces from stainless steel and exaggerated the length of the hood emphasizing the span of the work zone.
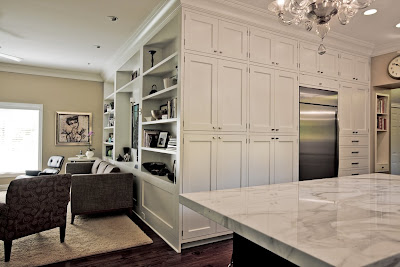
6. The sides of cabinets are often ignored in a design. This is because we tend to design in plan or elevation instead of three dimensionally. Letting the millwork wrap around the corner and turn into bookcases eases the transition from kitchen to living room as well as eliminating the need to design a pleasant end panel.
7. The ceiling is the supporting cast of any room and has a great influence over everything below it. Originally, I suggested painting it a barely-blue color but the Kellers were not at all receptive and now that I see the effect the chandeliers have on the ceiling, I’m glad we didn’t. The ceiling is only illuminated in the middle, allowing the edges to appear darker than the trim. I wanted to tint the ceiling color to make the crown appear bright and showcase its nuances. As a general rule, consider your ceiling the 5th wall but when holding up a paint chip to see what it will look like, hold it over your head. On the ceiling it is always up to 2 full shades darker!
7. The ceiling is the supporting cast of any room and has a great influence over everything below it. Originally, I suggested painting it a barely-blue color but the Kellers were not at all receptive and now that I see the effect the chandeliers have on the ceiling, I’m glad we didn’t. The ceiling is only illuminated in the middle, allowing the edges to appear darker than the trim. I wanted to tint the ceiling color to make the crown appear bright and showcase its nuances. As a general rule, consider your ceiling the 5th wall but when holding up a paint chip to see what it will look like, hold it over your head. On the ceiling it is always up to 2 full shades darker!
8. Respecting the lines can make or break a design. When choosing where to put the horizontal break in this side panel, we looked at the strongest line in the elevation; the one that continued across all of the cabinets. There is only one line that can be seen in the pantry, the uppers and the stove housing. This line originated from the door opening height. Controlling and relating horizontal lines is the tell tale mark of a designer.
9. A backsplash can really help or hurt a design. In this case, the back wall is a mess. The original window is low and the wall cabinet needed to be high enough to fit an appliance under it. Applying a distinct color or loud pattern would have emphasized the difference. Choosing to make a backsplash unique or bold should only happen if it is one of the three strongest elements in the space. In this design the island, the range and the window view get top billing. Bye-bye backsplash. Kudos to Wendy for this soft and lovely selection. You have the eye lady!
That’s 9 things that make this kitchen groovy. In two hours time, Polina knocked this one out of the park. Thank you for shooting it under the wire! What is the coolest thing in your kitchen? Do you have an awesome mixer? A unique material for a counter or backsplash? Do you use any unusual furniture in your space? Let’s talk kitchens for a sec.
 Visit my website: levelinterior.com to see more pictures of this great little project! I also wanted to note that the original cabinets, counters and appliances found a new home after demolition.
6 comments:
Love the work done to this place, it looks awesome. And I gained 2 pointers for myself for tight now regarding the bar stools - wider bases so they don't tip, and feet with a material softer than the floor it sits on. Thanks!
How do you recycle/reuse the old materials?
Prior to demolition I try to find new owners for salvageable products. In this case, the contractor had already claimed them before I started work. I dream of having my own salvage warehouse of goodies but for now, craiglist and word of mouth have been effective. There really needs to be a better system in place. Talk about sustainable. There is nothing more sustainable than craigslist!
This kitchen is awesome. Pat yourself on the back for this little project! Well done!
Sadly, the "before" picture is way better than my kitchen. I can only dream of having cabinets that weren't made in the 1970s...the after picture is stunning!
Excellent! Thank you for this very informative article. This is very interesting and useful for me. Keep up the good work.
Post a Comment